
Fix ‘QuickBooks Missing PDF Component Error’
QuickBooks is considered as the powerhouse of the accounting software industry due to its robust features which transforms the businesses financial management.
One of the features of QuickBooks is its ability to convert and print documents in PDF format which is a vital process for new-age businesses.
But the harsh part is even QuickBooks software throws various errors related to PDF to its users.
One of such errors is known as ‘QuickBooks Missing PDF Component Error’ which hampers users QuickBooks business workflows.
This blog will provide you required details about this error and proven methods you can implement to resolve this error permanently so you can use QuickBooks and run business operations without any interruptions.
Brief Introduction for ‘QuickBooks Missing PDF Component’ Error
QuickBooks users encounters many challenges while trying to convert their files to PDF version or print them.
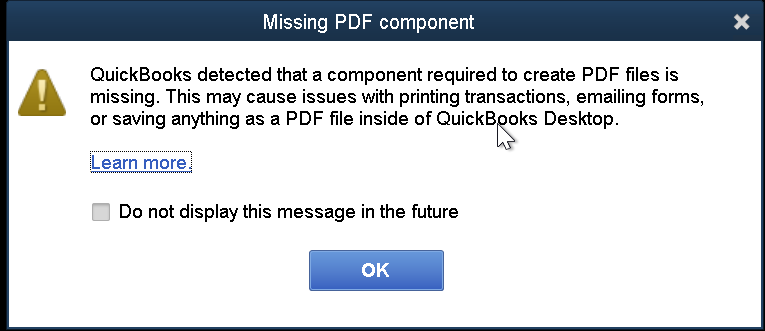
A common error message, ‘QuickBooks detected that a component pdf is missing’.
But unfortunately, users gets frustrated and panic when something like this appears on their system screen.
The worse part is, users are unable to know the root causes of these errors.
While hitting the Send Email option, they receive this error.
Possible reasons of ‘QuickBooks Missing PDF Component Error’
Due to following reasons, ‘QuickBooks Missing PDF Component Error’ occurs :
- Using older version of the Adobe Reader Program.
- Corrupted or missing Adobe Reader application.
- Turning off of Microsoft XPS document writer in Windows settings.
- Using older version of QuickBooks software.
Common PDF errors QuickBooks Users Encounters
Due to following reasons several PDF related errors occurs
- Unable to find PDF component.
- Unable to generate and print PDF.
- Driver is not working.
- Printer is unable to print due to connection issues.
- QuickBooks error 1722 / 1801.
For More : QuickBooks Connection Diagnostic Tool – How to Download, Install & Use It
Proven methods to fix ‘QuickBooks Missing PDF Component Error’
Follow below proven solutions to resolve the error :
Method 1 – Updating QuickBooks Desktop to current version
Updating your QuickBooks Desktop software to latest release will fix the ‘QuickBooks Missing PDF Component’ error :
- Go to the downloaded QuickBooks to update the landing page.
- In the given drop-down list, choose your QuickBooks product.
- Mention required information such as version, country, product etc.
- Select Search option.
- Tap on ‘recent updates’ and save the file.
- To finish the updating process, install the downloaded file.
Method 2 – Updating and fixing Adobe Reader
Corrupted or older version of Adobe reader leads to ‘QuickBooks Missing PDF component’ error.
Follow the below given steps :
Step 1 – Search for updates
- Find Adobe from the search bar.
- Open Adobe reader software.
- Search help tab and choose ‘check for updates’
- Go through the given suggestions so that you can install any updates which are available.
Step 2 – Fixing Adobe Acrobat Reader
- Shut down all running applications on your system.
- Tap windows + R to open the run window.
- Search ‘appwiz.cpl’ -> tab enter.
- Choose Adobe reader.
- Select ‘Uninstall / Change’.
- Tap Next and install it.
- Tap Finish to complete the installation process.
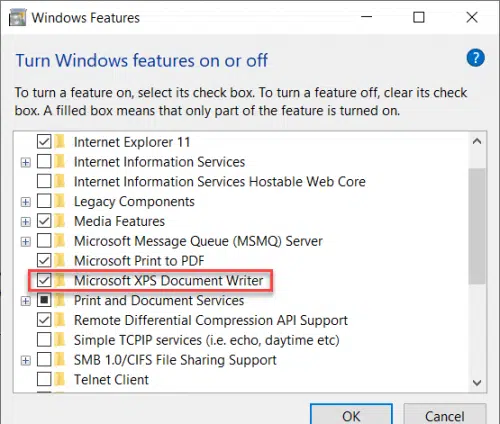
Method 3 – Activating while enabling Microsoft XPS Document Writer
You have to enable the Microsoft XPS document writer to fix the ‘QuickBooks Missing PDF Component’ error :
- Open run command.
- Search ‘appwiz.cpl’ and tap Enter.
- Select ‘Turn windows features on or off’ from the Programs and Features window.
- Mark the box mentioning ‘Microsoft XPS document writer’ to enable it.
Method 4 – Using QuickBooks Print & PDF Repair tool
The tool, QuickBooks Print & PDF repair tool is built to fix several Print and PDF related errors:
- First, you have to install ‘QuickBooks tool hub’ software from the official site.
- Open QuickBooks tool hub software.
- Select Programs Problems option.
- Choose ‘QuickBooks PDF & Print Repair tool’ to run it.
- Now, save or print a PDF after the fixing process to finish.
Read More : Fix ‘QuickBooks File Doctor Not Working’ Error
Method 5 – Updating permissions for your TEMP folder
Reset permissions for the TEMP folder can fix PDF related issues :
- Search ‘%TEMP%’ from the search bar in the start menu.
- Do right click on TEMP folder.
- Choose Properties.
- Select Security option.
- Make sure all groups and names have complete control.
Method 6 – Setting PDF viewer as the Default Program
Follow the below steps to set PDF viewer as default program :
- Go to Windows settings.
- Select Apps -> Default apps.
- Browse to locate .pdf file.
- Select its default program.
- Choose QuickBooks PDF viewer or other installed PDF viewer.
- Tap on ‘Switch anyway’ to finish the process.
Method 7 – Check, Adjust & Reinstall XPS Document writer
Testing the XPS Document writer and reinstalling it will fix ‘QuickBooks Missing PDF Component Error’
Follow the below steps :
Step 1 – Running a test on the XPS document writer while printing outside the QuickBooks App
- Select Print from the file menu.
- From the print box option, select the Microsoft XPS document writer.
- On system desktop, save the file with .XPS extension.
- Locate the .XPS file.
- In case any error occurs while using the .XPS file then you have to reinstall the Microsoft XPS Document writer.
- In case you can view any other files and errors then it means that security settings is the root cause of your issues.
- Reinstall the printer if prompted in-case there is any issue with printing.
Step 2 – Reinstallation Microsoft XPS Document writer
Follow below process to reinstalling Microsoft XPS Document Writer :
For Windows 8
- Go to system settings from the start menu.
- Select Control panel.
- Select Devices and Printers option.
- Choose the Microsoft XPS document writer.
- Choose Remove device from the given menu.
- Click Yes to accept the change.
- Select Add a printer from the toolbar.
- Now, choose Add a local printer / Network print along with manual preferences.
- Choose PORTPROMPT : (Local Port).
- Tap Next.
- Choose Microsoft in the ‘Manufacturers’.
- Choose Microsoft XPS document writer v4 after this.
- Choose Replace Current Driver from the given menu.
- Remove v4 from Microsoft XPS document writer from the printer name field.
- Uncheck the box to make XPS of your default printer by completing Finish.
For Windows 7/ vista
- Go to Devices and Printers option from the start menu.
- Select Microsoft XPS document writer.
- Choose Remove device from the menu.
- Check your voice by choosing Yes.
- Choose Add a local printer from the given toolbar.
- Choose ‘use an existing’ port from the given option.
- Choose XPS Port: (Local Port).
- Choose Microsoft from the list of manufacturers.
- Choose Microsoft XPS Document Writer v4.
- Select Next to replace the current driver to finish the process.
Method 8 – Altering the Security Software Settings
Security software like Norton Antivirus / McAfee firewall hinders the creation process of .XPS files.
Make sure to verify these settings while consulting with your admin for technical assistance.
Recommended : How to Fix QuickBooks POS SQL Error
Conclusion
The above mentioned steps can fix the ‘QuickBooks Missing PDF component ’ error in maximum scenarios. In case the error still exists after implementing the steps mentioned then you need technical guidance.
You can connect with ProAdvisor support technical experts via email id info@proadvisorsupport.com or dialling on their toll-free number (888) 200-9496 for quick and guaranteed assistance.
Hurry up. Connect Now so that you can function your business workflow without any interruptions.
FAQs
1. How to Fix "QuickBooks can’t Complete the Current Action Due to a Missing Component”?
To resolve this error, follow the given steps :
- Downloading and installing the QuickBooks tool hub from the official website.
- Now, run the print and PDF repair tool.
- Now, you have to reset the temporary folder permission.
- Make sure that XPS can print.
- Lastly, verify print settings.
2. What to do When QuickBooks Error Shows “You do not have a PDF Viewer Installed on Your Computer”?
You have to set Adobe Reader as the Default PDF viewer :
For Windows 7, 8, 8.1 :
- Go to Control panel.
- Choose Programs
- Set default programs.
- Search and locate Adobe Reader.
- Set it as the default program.
Windows 10
- Go to Settings.
- Go to Apps -> Default apps.
- Find the PDF extension file to set Adobe Reader as the default.
3. QuickBooks Could not Create the Necessary PDF Files, Unable to Save Forms or Reports as a PDF Using Windows 10. What to do?
Follow the steps below :
- Open that PDF file using Adobe software.
- Select the Edit menu.
- Choose Preferences.
- Choose General & uncheck ‘Show online storage when saving files’.
- Tap Ok to save settings.
4. What if the File Doesn’t get Saved Because of the QuickBooks Missing PDF Component Error?
Verify the storage settings :
- First, open that PDF print file using Adobe Acrobat software.
- Select Edit menu and preferences.
- Use the General tab.
- Unmark ‘Show online storage when saving files.’
- Tap Ok to save settings lastly.
5. Are there any other Methods to Fix the QuickBooks Missing PDF Component Error?
Follow the below steps to prevent the error :
- Switch on XPS services.
- Then, install / repair MSXML 6.0.
- Create a new template form in the program.
- Do not use your system’s print spooler service, for terminal services.
- Check the XPS document writer’s windows User permissions.
6. What is a QuickBooks Repair tool?
QuickBooks repair tool is an utility tool which is available in QuickBooks Tool hub software application, which helps users to fix issues related to printing or saving PDF i.e., ‘QuickBooks missing PDF component ’ error. This feature is located in the Program Problems option in QuickBooks tool hub software.